Cracking password hashes with Google Colab - FOR FREE!
I recently found myself on an engagement without a viable cracking rig. While searching for alternative ways, I came across some methods utilizing Google’s Colab. According to Google, Colaboratory or “Colab” for short, is a product from Google Research. Colab allows anybody to write and execute arbitrary python code through the browser, and is especially well suited to machine learning, data analysis and education.
What’s most interesting about this resource is that it allows GPU access and not just any GPU but we’re talking about Nvidia Tesla P100, P4, T4, and K80. The only drawback is that without the Pro version of Colab, everything gets wiped in 12 hours. Even with a time-limit this still worked out great for me. I began my journey by reading up on a few of the basics and quickly installed hashcat and began cracking hashes. I was surprised by the speed at which it was cracking passwords and will include some benchmarks below. However, I knew there had to be a better way to keep sessions, transfer files, and automate this which led me to “colabcat”. Colabcat is a GitHub repository that shares a ipynb file that’s already filled out and ready for cracking. By adding your Google Drive, you get easy file transfers, session restore capabilities, and lose the headache of having to write it all down yourself. For those that are new to Google Colab, read on and we’ll take this step by step to get you cracking in Google’s Colab.
Process
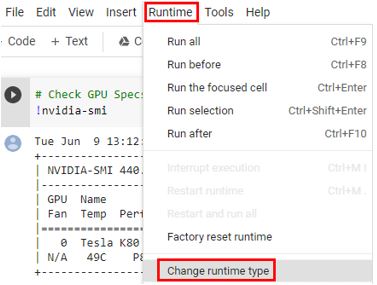
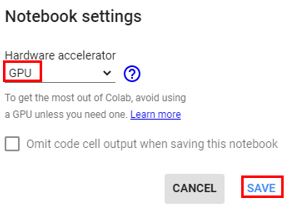
First, head over to Colabcat. In the tools bar at the top, click Runtime > Change runtime type > GPU and click save.
If you want to use the code as-is, you’ll need to set up your Google Drive. I recommend setting up a Google account that is not used for any other purpose as you will need to give Google Drive File Stream access to parts of the account. To do this, create a directory called “dothashcat” and then create a sub-directory named “hashes”. This would also be a good time to place the hashes you want to crack in this folder.
Now we’re going to edit some of the code to tailor it to our purposes. In the last box that includes the hashcat commands to run, you’ll want to either write your own hashcat command or uncomment one that is provided. Be sure to edit the hash name from “test.hccapx” to whatever you named the file containing your hashes.

When you are ready to run, click Runtime > Run All. You could also use CTRL+F9. If you chose to utilize Google Drive, then you’ll need to enter in an authorization code. To do this you need to go to the URL that is listed on the page which will take you to the access request page from Google and you would select “Allow”. The next page will give you code to copy and past into the application. You enter it in the box below where you got the URL and press enter.

Side-Note: You need to prepend an ! to any commands that you want to run on the host itself; ex. “!whoami”.
Benchmarks
At least with the free version there’s no way to select a specific GPU and between two separate sessions of running this I received the P100 and the K80.
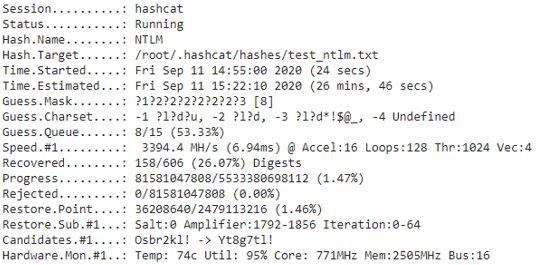
Here is the K80 doing a brute force attack against a list of 606 NTLM hashes.
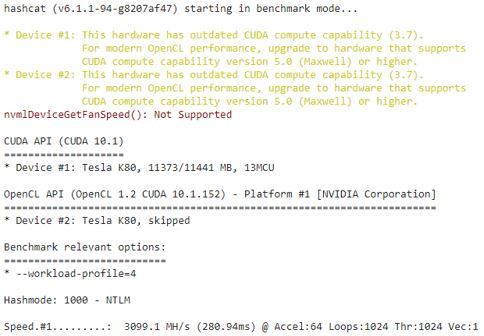
Here is the benchmark test for the K80 (using this command “!hashcat -w 4 -m 1000 –benchmark”).
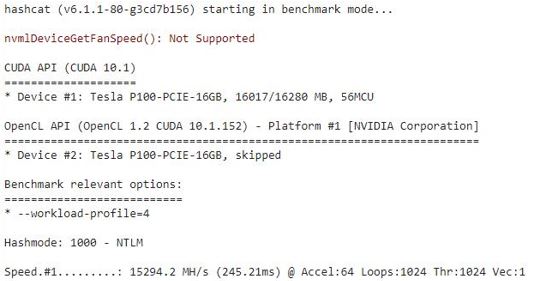
Here is the benchmark for the Tesla P100 (using this command “!hashcat -w 4 -m 1000 –benchmark”).
Give it a try on your next hash cracking endeavor and let me know how it goes!